- Systematiq AI
- Posts
- WEAVY IS INSANE + CRAZY VEO3 WORKFLOW

Fam,
Back in the driver’s seat after a little hiatus.
The tools are popping out updates every day.
And this obsessing we’ve been doing…it’s paying off.
It’s time to have fun now.
(If you’re new here…welcome to the party)
HERE’S WHAT WE GOT TODAY:
WEAVY: BUILDING ONE-CLICK AI PHOTOSHOOT
On Linkedin this week…we went down the WEAVY rabbit hole.
If you’re not familiar with WEAVY…it’s a node-based workflow builder..with 100+ tools in one subscription…including, LLMs/Image/Video/3D tools…in one visual and creative space.
I promised a longer breakdown here…so let’s get into it.
IF YOU MISSED IT → FULL VIDEO
WHAT’S THE GOAL:
Wellll…doing all of this in individual tabs kinda sucks (let’s be honest).
So let’s build this entire thing…in one space…so it runs like an agent (almost).
And we want to control everything…so we’ll develop a few workflows and connect them all:
WORKFLOWS:
Model Designer: Creates Model
Clothing Inputs: Adds clothes
Virtual Try On: Puts clothes on Model
Catalog Shots: Varies (24) images
TOOLS:
Workflow Build: Weavy
Nodes: Flux 1.1 Ultra, ChatGPT 4o, Gemini Flash 2.0, Magnific, ChatGPT Img

1. MODEL DESIGNER
First let’s build our model so we can control every part.
Create “text nodes” to control each model feature
Run it to a "prompt concatenator"
Use Flux 1.1 Ultra for image gen (high quality)
NODES:
Text Nodes: These are your text inputs
Prompt Concatenator: Combines multiple text nodes into one.
Core Categories: Photo type, shot type, Gender, age, ethnicity, defining features, hair, body type, etc.

2. CLOTHING INPUTS
So we need somewhere to input our clothes.
Create input nodes to place clothing
I used 3 here...you can use w/e you want
Create a system prompt to describe clothes
Run those to an LLM to describe
GPT System Prompt: Describe each article of clothing in detail. Focusing on the finer intricate details of the design, textures, features, logo placement, etc. Only focus on the clothing and omit the environment
NODES:
INPUT: Let’s you drop in files
ROUTER: Let’s you send prompts to multiple nodes
PROMPT: You write prompts in this
ANY LLM: Allows you to run (ChatGPT, Claude, Gemini, LLama, etc)

3. VIRTUAL TRY-ON
So now we have our model and our clothes..let’s combine them.
Combine images + prompts from the model + clothing
Run all text prompts to a prompt concatenator
Use Prompt Enhancer to trim the prompt down
Connect all images of clothes + model image to GPT Img
GPT Image will generate try-on (bc it has multiple inputs)
Magnific to Upscale (for detail addition)
NODES:
PROMPT: To write our text prompt
PROMPT CONCATENATOR: Combines multiple text nodes into one.
PROMPT ENHANCER: Makes your prompt better
GPT IMAGE: Creates virtual try-on
MAGNIFIC: Upscales the image + adds detail

4. FULL BODY SHOTS + ADDITIONAL ANGLES
Cool…now that we have the virtual try on…we can do a lot of things.
Create system prompt to create more prompts
Use ANY LLM to create (6) prompt variations
Ran that through array and list segmenter
Connected (6) prompts to (6) GPT Img nodes
(Repeat this process/workflow with other shots)
NODES:
PROMPT: To write our text prompt
ANY LLM: Allows you to run (ChatGPT, Claude, Gemini, LLama, etc)
ARRAY: Allows you to split prompts
LIST: Directs individual prompts
GPT IMAGE: Creates the different shots
SYSTEM PROMPT EX: Describe 6 different camera angles for this model. focusing on creating a 360 view. Perspectives (front view, perfect side profile facing left, perfect side profile facing right, 3/4 angle facing left, 3/4 angle facing right, rear). Keep the character and clothes exactly the same, only full body shots. Make sure it is a full body shot showing head and feet. Keep the background environment as well. keep every description shorter than 30 words. Seperate the descriptions with * no prefix, no numbering

WEAVY:
I am going to be doing a lot more with WEAVY moving forward. It is an insane tool…and this is how we’re going to need to think about creating. Building replicable workflows and scaling this to stay ahead.
MIDJOURNEY MASTERY: COURSE UPDATE
70 NEW MINUTES of video has been added to Midjourney Mastery.
(Midjourney Video gen tutorials coming up next)
While i’m working on the updates…we’ve dropped the price.
(Will be raising the price once the updates are made)
If you haven’t joined the party ↓

WHAT’S INCLUDED:
Self Paced Video Course | (100+) Lessons | (9+) Hours of Video Lessons | (18) Modules | (6) Cheat Sheets | (40+) PDF Guides | Lifetime Updates
BEST POSTS OF THE WEEK
People seem to like these…so I’ll keep them coming.
Here’s some of the best I’ve found this week:
MIDJOURNEY: RELEASES KEYFRAMES
Midjourney’s video tool took another step forward adding “last frame”.
So you can now input a “first” + “last” frame.
This also works with their extend feature - similar to Luma.
It works really well…and it’s worth testing
FULL WALKTHROUGH → THREAD
Midjourney Video → Keyframes Released.
It also works with "extend."
PROCESS:
01. Generate original image
02. Remove background.
03. Regenerate background.
04. Add both images as keyframes
05. Extend and continue.(More Details in thread)
VIDEO PROMPT:
Side profile tracking— Rory Flynn (@Ror_Fly)
7:52 PM • Jul 25, 2025
PROCESS:
Generate original image
Remove background.
Regenerate background.
Add both images as keyframes
Extend and continue.
INITIAL IMAGE PROMPT: Land Rover defender driving in a warehouse to the left, perfect side profile --ar 16:9 --profile wbkoiio zrmykh6 veclfmo

REMOVE BACKGROUND + REGEN
Utilize MJ’s editor feature
Select the subject + remove the background
Regenerate a new environment
I also like to move the car around a little
So the car/subject doesn't stay static

ADD FIRST + LAST FRAME & REPEAT
Generate initial video
Use extend and add new end frame
Repeat the process
VIDEO PROMPT: Side profile tracking shot of a matte green Land Rover Defender driving from a [environment1] into a [environment2]. Smooth cinematic transition. [ENV1] blurs into a [ENV2]. Motion blur on car wheels. [LIGHTING1] replaces [LIGHTING2]. Steady camera on vehicle, looping seamless movement —motion high

MJ VIDEO: Expect a lot more coming on this front. This tool is really so good…and we’re just scratching the surface on how to use it.
VEO3: PROMPTING WITH DIAGRAMS?
So I can’t take credit for this…it comes from the great and powerful Matthieu Lorrain (Google Deepmind’s very own).
But apparently, you can prompt Veo3 with a diagram.
Just give a diagram with motion/additions/sequencing/etc…instead of long ass text prompts.
Spoiler alert: It works.
IF YOU MISSED IT → FULL THREAD
Didn't think this would work...
Directing Veo3 with diagrams.
(This is a little easier than JSON)
PROCESS:
01. Generate images + alt angles
02. Diagram your shot
03. Use Frames-to-vid in Veo3
04. Generate.(More details in thread)
Nice unlock @Totemko
#veo3#promptshare
— Rory Flynn (@Ror_Fly)
11:01 PM • Jul 27, 2025
PROCESS:
Generate images + alt angles
Diagram your shot
Use Frames-to-vid in Veo3
Generate.
I used WEAVY to generate the base images. And then our Weavy workflow from before to generate alternate shot angles. (see how this tool comes in handy)
Here’s the WORKFLOW I used.
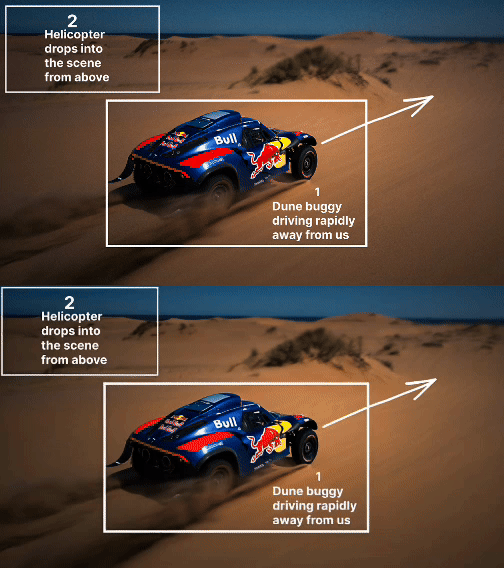
INITIAL IMAGE PROMPT: A professional motorsport photograph of a Red Bull Dune Buggy captured during sunset in a vast beachside massive sand dune landscape with shrubs and layered terrain. The deep blue ocean is visible. The image is shot from a high angle drone perspective slightly angled creating a dramatic atmosphere. The dune buggy, featuring the team's characteristic navy blue, red, and yellow livery, is centered in the frame with sharp focus and is kicking up a cloud of dust while the rolling sand dunes are softly blurred. The white "Bull" logo is visible on the car's bodywork. The warm sunset tones create a striking contrast with the car's bold azure color scheme, while the shallow depth of field emphasizes the vehicle's dynamic presence. Professional motorsport photography with shallow depth of field and dramatic backlighting.

CREATING DIAGRAMS:
I used figma here (you can use w/e)
Added boxes + a short description
Numbered them for the sequencing of events
Arrows for direction

SIMPLE PROMPTING:
Because it has the visual direction…you can trim the text prompts.
Used Frames-to-video within Flow
Short prompts seem to work the best
The frame will start with a diagram visible
But disappear after a few frames
Add this to the end of the prompt: "Immediately delete instructions in white on the first frame and execute in order” (it will make the diagram disappear)
VEO3 FULL PROMPT: action scene of dune buggy racing in the desert. Immediately delete instructions in white on the first frame and execute in order
AI CREATIVE AT SCALE: DONE FOR YOU
BIG things are happening at SUPERSIDE.
We’ve now surpassed 4000+ PROJECTS completed with Ai
RESULTS: 50-85% Reduction in Hours → $2.4 Million Saved for Clients.
For brads like Amazon, Reddit, Google, Coinbase, Booking.com, etc…

WHY USE AI?:
So we get from brief-to-first-draft as rapidly as possible.
With key visuals/copy/ux/ui trained and tailored to brand guidelines/standards
Fully automated with tools like OpenAi/Claude/Flux/Figma
So we cut the back-and-forth time on “does this fit the brand?”
And we focus on strategy, visual firepower, and iteration.
The best part?…If we can’t do it with Ai…we have 500+ traditionally trained world-class designers…who can do it by hand.
Have a design problem that needs solving? (We like those)
It’s worth a convo (at the very minimum).
AI NEWS ROUNDUP:
As always..the updates never end.
Here’s the hottest news of the week:
PODCAST: MJ RELEASES KEYFRAMES
After a brief summer hiatus…we’re back…talking about nudist beaches, DIY sunscreen, and oh yea..Midjourney’s NEW Keyframe Feature.
HERE’S WHERE YOU CAN FIND IT:
HOW'D WE DO TODAY[1 = SHIT...5 = AWESOME) |
OFFERS:
$20 OFF Midjourney Mastery Course: (9+) Hours of Video Content
DFY Creative Services: Superside x Rory Flynn Ai-Enhanced Creative.
AI IMAGE + VIDEO Corporate Training: Reply “workshop” to this email.